Before going forward, we should note that AntiDupl supports image formats such as JPEG, GIF, TIFF, BMP, PNG, EMF, WMF, EXIF, ICON, JP2, PSD, DDS, and TGA. Most of your pictures are likely in the JPEG, GIF, and PNG formats, therefore, the others are just there for professionals.
How to use AntiDupl open source duplicate photo finder
1] Choose your Path
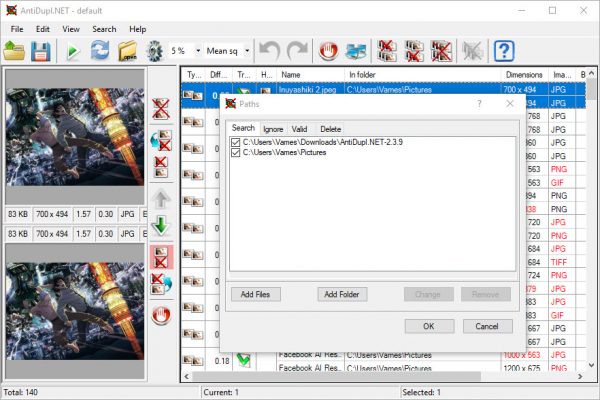
Before getting along with the search for duplicate images, you must first select which folder you’d want the tool to search through. To do this, you’d need to click on the Search tab, then select Paths from the drop-down menu. Next, click on Add Folder, locate the folder you want to add, then select OK.
2] Execute a search
Now, this is super easy to accomplish. Again, click on Search, then Start Search. Alternatively, you could just click on the green Search icon. If you have a lot of images for AntiDdupl to go through, and if your Windows 10 computer doesn’t have a fast processor, then it will take some time for the search to be completed. Once everything is done, you’ll see the duplicate pictures in the left pane, and at the right, the name of the pictures and their locations.
3] Delete and Replace
After the completion of the search, you’ll be thinking about deleting the duplicates, and that’s quite easy. Just right-click on the name and choose if you want to delete the first duplicate or the second. Additionally, you can choose to replace one duplicate with the other, or just delete them all. Furthermore, the option is there to rename images and mark the entire results as a mistake. It should be noted that folks can use the icons above to perform the same delete tasks we just spoke about.
4] View
Maybe you’re not too keen on the view and how things are laid about. If this is indeed the case, then we recommend clicking on the View option, then hover the mouse button over View mode of results. From there you can choose how you’d like to search results to look. There are only two options, unfortunately, but it’s no problem from our end.
5] Options
Users of AntiDupl can get to the Options menu by clicking on the Gear icon or by clicking Search, then Options. This section is filled with many ways to make the tool operates in a way that best suits your needs. For example, users can control the image size, the image type, along with the minimum and maximum size of the images that show up in the search results. Interestingly enough, then checking for defects, the tool can also check for blurriness or blockiness in photos for deletion. Overall, we’ve come to find out that AntiDupl is the most powerful image duplicate finder we’ve ever used s far, and what’s great is the fact that it’s free to use. The user interface is not the best, but that’s something we can live with. You can download AntiDupl via SourceForge right now.
