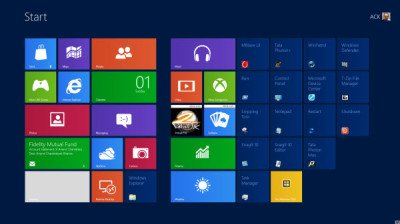
By default, Windows 8 recognizes the screen resolution of your computer and then accordingly displays the app tiles in rows, as it thinks fit. For example, if you have a computer running Windows 8, with a screen resolution of 1024×768 pixels, the Start Screen will have Metro apps displayed in four rows. If you are working on a computer with a high screen resolution, like say 1920×1080 pixels in the above image, then Windows 8 Metro apps will be pinned to the Start Screen in five rows. In short, the number of a row of apps that appear in the Windows 8 start screen, is completely dependent on the resolution settings. If you increase the screen resolution of the display by a margin, you will be able to display more rows. If you decrease it, lesser rows will be visible in the Start Screen of Windows 8. If you wish, you can fine-tune the screen resolution settings as per your convenience. If you are interested in knowing what should be the maximum number of app rows allowed in the Start Screen for your resolution, check out this table:
Change default number of apps rows in Windows 8.1 start screen
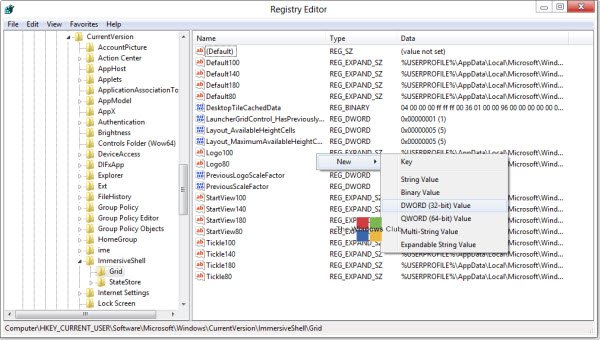
Press Windows + R. The action will launch a ‘Run’ dialog box on your computer screen.In the empty field of ‘Run’ dialog, type ‘regedit.exe’ and hit ‘OK’Then, click ‘Yes’ if prompted with a User Account Control (UAC) promptNow in the ‘Registry Editor’ that will open up on your computer screen, search the following registry key:
In the right pane of Registry Editor search for the entry Layout_MaximumRowCount. If it does not exist, you may be required to create it. To do so, right-click on a empty space in the right pane of Grid, click on New and DWORD (32-bit) Value, then type Layout_MaximumRowCountand press Enter. If you find it, set its value to a number higher or lower than the current one. For instance, if you have 5 rows in the Start screen, set the value to 4 or 3. The maximum possible is 5 – this depends on your screen resolution. I have changed mine to 4.Once completed, click on the OK button to close the Registry Editor.
Restart or Sign out of your Windows 8 computer for the changes to apply.
You will now see that the start screen displays 4 rows. To restore defaults, you may simply delete the newly created registry key. Do remember that it is always a good idea to create a system restore point first, before making any changes to the Windows Registry. Also, check out how you can use PowerShell or VBScript to change the Number of App Tile Rows on the Windows 8 Start Screen. Want to change the color of the Tiles on Start Screen in Windows 8? Have a look at Windows Tile Color Changer.

